Precision Alignment Techniques for High-Quality Auto Tint Installation
GET A FREE ESTIMATEMarch 13, 2026
Getting auto tint installed might seem simple from the outside. You drop your vehicle off, pick it up a few hours later, and drive away with sleek, darkened windows. What happens in between, though, is far more involved than most people realize. A truly clean tint job, one that looks factory-installed and lasts for years, is the result of careful preparation, precise technique, and a controlled environment. At Perfection Plus Auto Salon, every window tinting installation we perform follows a deliberate process built around precision alignment. Here is a closer look at what that process actually involves and why it matters for your vehicle.
Starting with a Clean Surface
Before any film touches glass, the window surface has to be immaculate. Even a single dust particle or trace of oil trapped beneath the film will create a visible imperfection that no amount of smoothing can fix after the fact. This is why surface preparation is not just the first step in the process. It is arguably the most important one.
We start by applying a non-ammonia-based glass cleaner across the entire window surface. Ammonia-based cleaners are common in most households, but they degrade tint adhesive over time, which leads to premature peeling and bubbling. After applying the cleaner, we wipe thoroughly with high-quality microfiber cloths, paying close attention to edges and corners where debris tends to accumulate. For stubborn contaminants like road sap, mineral deposits, or paint overspray, a razor blade scraper is used at a low angle to lift the material cleanly without scratching the glass.
Once the surface is clean, we rinse the window with distilled water. Tap water contains minerals that can leave a faint haze on the glass and interfere with film adhesion, so distilled is always the preferred choice. The window is then dried completely before any film is introduced. Working in a climate-controlled, enclosed workspace allows our team the time they need to position the film without it curing too quickly, and it keeps airborne dust from settling on a freshly cleaned surface before the installation begins.
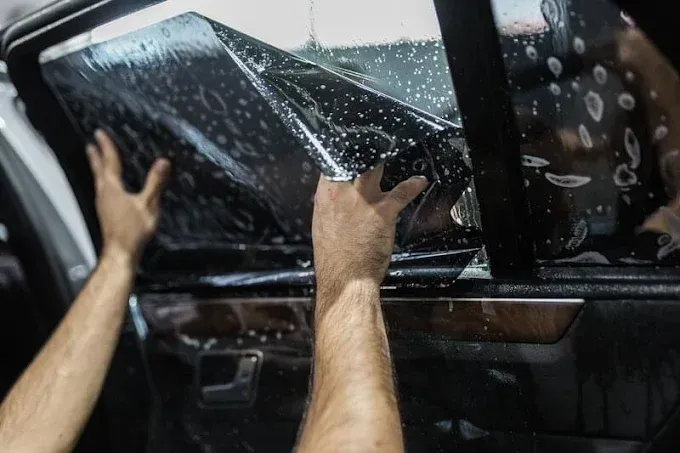
Positioning the Film with Precision
With a clean surface ready, the next challenge is getting the film into exactly the right position before it bonds to the glass. This is where alignment technique separates a mediocre tint job from a professional one, and where the details of the process become most visible in the finished result.
One of the key tools we use during this phase is alignment powder, a fine substance applied lightly across the wet glass surface. It temporarily reduces the film's tackiness, creating just enough slip to allow repositioning without tearing or stretching the material. This is especially important on complex window shapes, where a single misplaced move could compromise an entire panel. Think of it like the difference between applying a sticker that bonds instantly and one that gives you a moment to adjust before it sets. That brief window of control makes a significant difference in the quality of the outcome.
To give our team clear visual references during positioning, we use water-soluble markers to draw guide lines directly onto the glass. These horizontal and vertical references act as anchor points, ensuring every edge sits exactly where it should, whether it follows a straight line or curves to match the geometry of a rear windshield or panoramic roof. Once the film is secured, the guidelines wipe away cleanly without leaving any residue on the glass. These steps might seem minor in isolation, but they eliminate the guesswork that leads to off-center tint, uneven edges, and gaps that become obvious in direct sunlight. Precision at this stage means fewer corrections later and a cleaner, more consistent result from window to window.

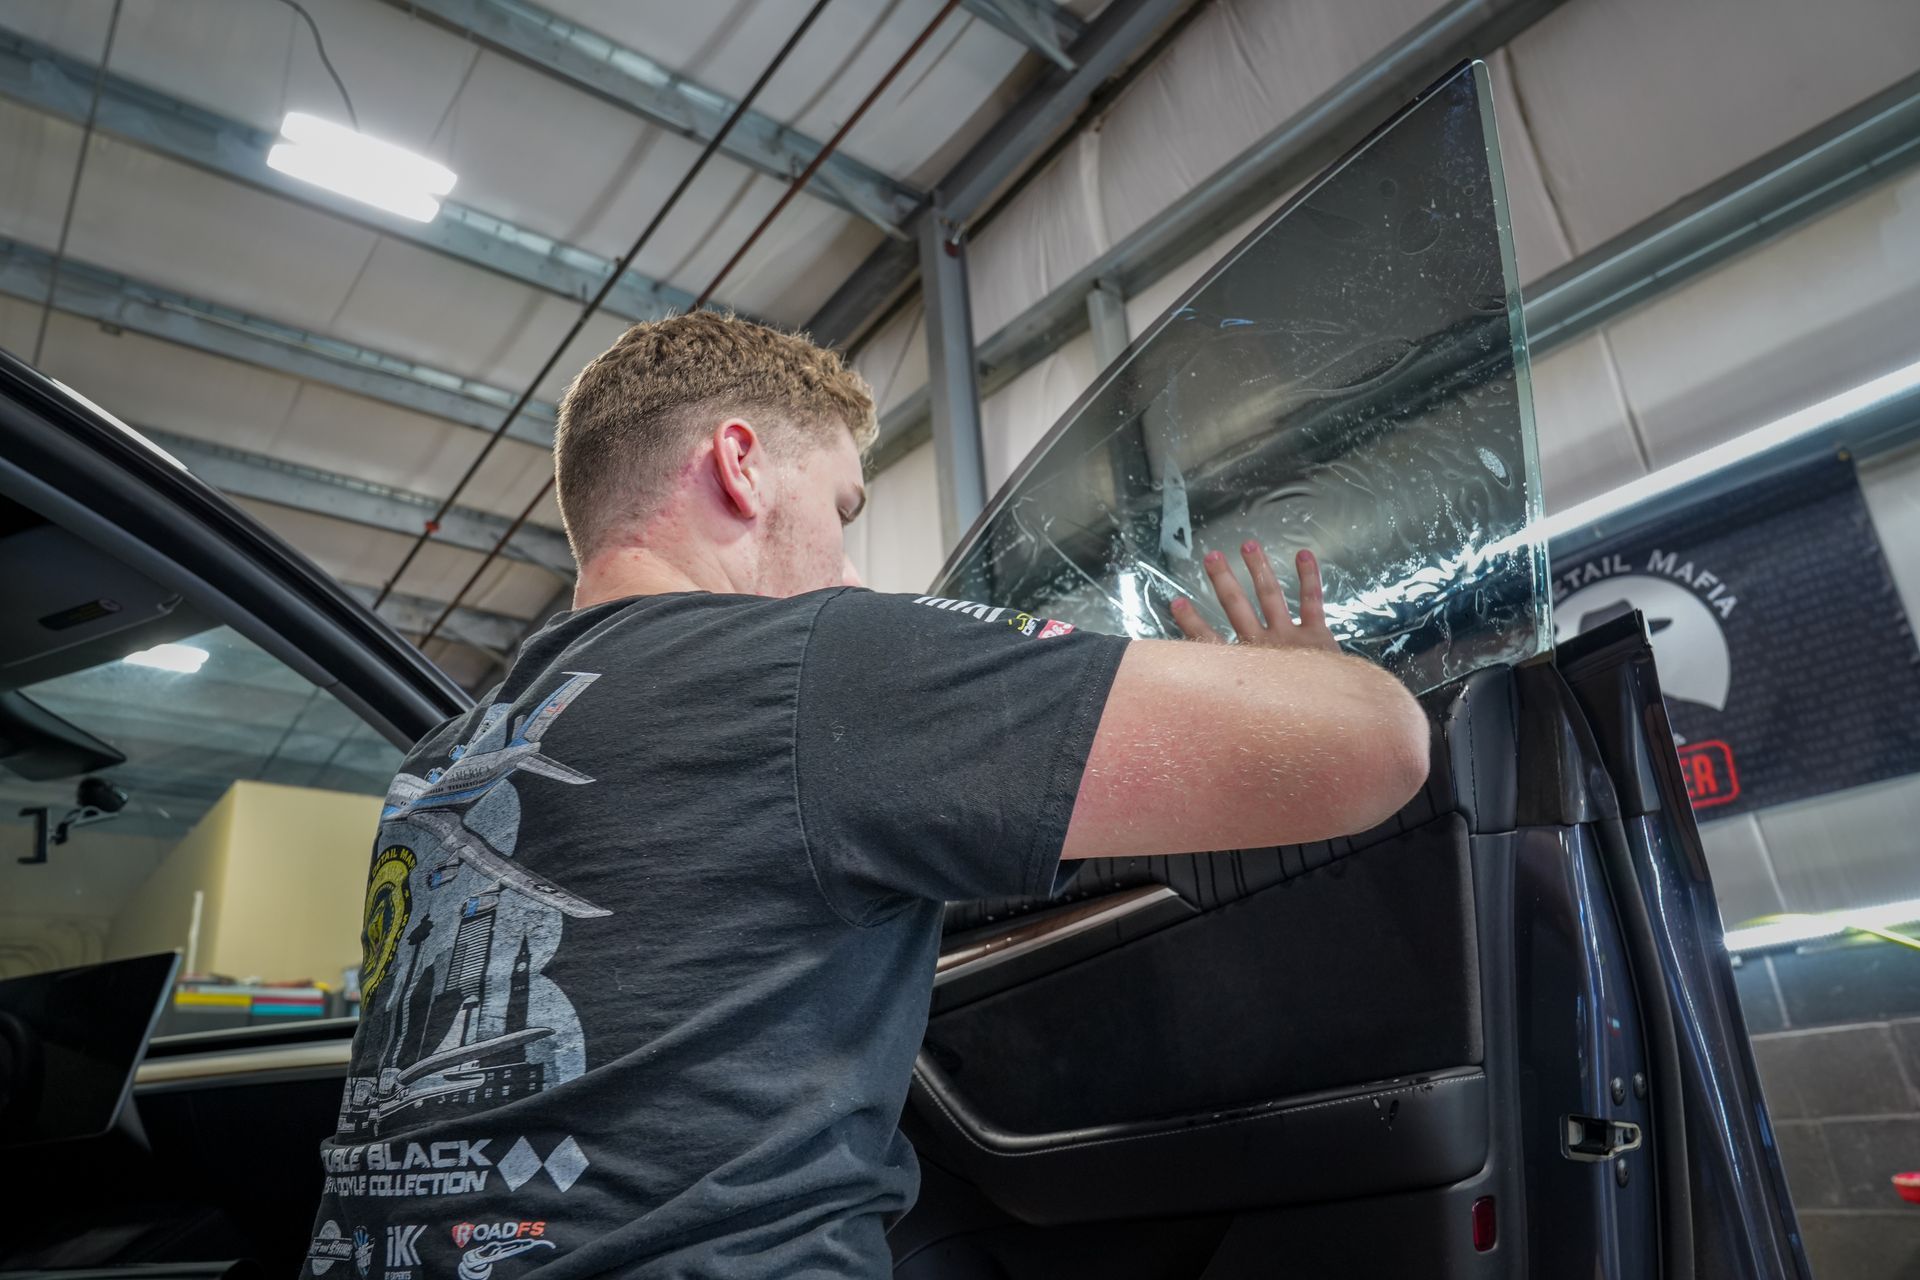
Applying Heat to Curved Surfaces
Flat windows are relatively straightforward. Curved surfaces, rear windshields in particular, require an entirely different level of skill. The challenge is that window film is a flat material being asked to conform to a three-dimensional surface. Without the right technique, the result is wrinkling, puckering, or what installers call "fingers," which are narrow air pockets that stretch along the curve and mar an otherwise clean installation.
The solution is heat shrinking, a technique that involves applying controlled, even heat to the film during installation to encourage it to conform to the shape of the glass. Using a professional-grade heat gun, our team works in steady, deliberate passes across the surface, never holding in one spot too long, which can damage the adhesive or distort the film's optical clarity. As the film warms, its structure becomes pliable enough to be pressed and shaped around curves without tension points forming along the edges.
A squeegee with a soft rubber edge is used simultaneously to press out bubbles and fingers as they form. The key is to apply consistent, even pressure that is firm enough to seat the film against the glass but controlled enough not to stretch or mark the surface. On a challenging rear windshield, this process often involves multiple careful passes with both tools, working across each section until the film lies completely flat and the surface reads clean from every angle. When this step is done correctly, the tint conforms to the glass so cleanly that it is nearly indistinguishable from factory-applied tint. When it is rushed, the problems tend to become more visible over time rather than less.
Trimming and Edge Work
Once the film is positioned and seated, precise trimming is required to bring it flush with the window's edges. A sharp blade is essential here. A dull one drags through the film rather than cutting cleanly, which creates ragged edges that peel early and allow dirt to work its way under the film along the seam. Our team keeps fresh blades on hand throughout each installation to ensure every cut is clean and the edges hold up long term.
After trimming, a plastic trim tool is used to tuck the film neatly into the window gaskets and the seams where glass meets the rubber seal. This step produces the clean, finished edge that defines professionally installed tint. It also stops the film from lifting at the corners over time, a common sign of a poorly done installation. A final pass with the heat gun across the entire window activates the adhesive fully and drives out any remaining moisture from beneath the surface. At this point, the film should lie completely flat with no visible seams, no trapped air, and no gaps along the edges.
The Final Inspection
A completed installation is not finished until it has been inspected carefully under bright light. Our team examines every window for trapped particles, air pockets, or any section of film that has not fully bonded to the glass. Small bubbles that remain at this stage can often be worked out with the trim tool before they become permanent. Anything that falls short of our standard is corrected before the vehicle leaves the shop. This inspection reflects the same standard we apply across every service at Perfection Plus Auto Salon. There is a real difference between an installation that looks fine from a distance and one that holds up to close examination in direct sunlight. We aim for the latter on every vehicle that comes through our doors.

Caring for Your Tint After Installation
Once your vehicle leaves our shop, a short curing period begins. During this time, leave your windows up for at least three full days. Rolling them down before the adhesive has fully set can introduce creases or air pockets that were not present at the time of installation. You may also notice small water bubbles during the first week. This is a normal part of the curing process and they will clear up on their own.
For ongoing care, avoid ammonia-based glass cleaners entirely. Use a mild, ammonia-free formula and a soft microfiber cloth to clean your tinted windows. Paper towels and abrasive scrubbers can introduce fine surface scratches over time that affect both the appearance and the clarity of the film. With proper maintenance, a professionally installed tint can continue blocking UV rays, reducing interior heat buildup, and protecting your upholstery and dashboard for years to come.
The Difference Precision Makes
Window tinting is a service where the gap between a careful installation and a rushed one tends to widen over time. A well-installed tint looks clean, sits flat against the glass, and holds up through years of Central Oregon weather, including the dry summers, the temperature swings, and the UV exposure that comes with life at elevation. A poorly installed one starts showing its problems within months: bubbling at the edges, lifting at the corners, or a haze that dulls what should be a clean, dark finish.
At Perfection Plus Auto Salon, our tinting process is built around the same attention to detail we bring to every service we offer. If you are considering window tinting for your vehicle in Redmond or the surrounding Central Oregon area, we are here to walk you through your options and make sure the job is done right.
Schedule an appointment today!